Seaside Inspiration for the Home
Trips to the beach are popular getaways – but if you can\’t get to the beach, you can bring it to your home.
- Find or make pillows and accents with a nautical or beach theme.
- Make a beach terrarium with a glass bowl, sand, shells and pieces of coral.
- Print beach photographs or scan illustrations and frame a set in white wood frames.
- Create a tablescape with books about the sea, neutral colored candles, and items like sand dollars and shells in a wooden tray.
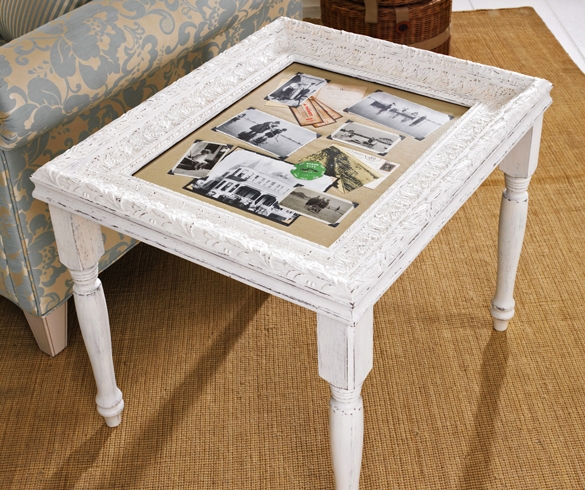
This antique-look Photo Frame Accent Table is ideal for displaying fun-in-the-sun photos past and present. A whitewashed finish is the natural choice for breezy, beachcomber appeal. You can find more beach-inspired projects like this at www.joann.com/projects/.
Photo Frame Accent Table
Some experience necessary
Approximate Crafting Time: 3 to 5 hours, plus drying time
Supplies and Tools:
- Large picture frame with glass
- 4 table legs and brackets for attaching to back of frame
- L-brackets and screws for securing photo panel to underside of frame
- Martha Stewart Crafts acrylic paint: Gray Wolf, Porcelain Doll, Wedding Cake, Linen
- White household candle
- Sandpaper: course and fine
- Foam core board
- Linen fabric
- Batting or felt
- Adhesive or tacky glue
- Attach hardware to frame for removable legs.
- Paint legs and frame Gray Wolf; apply 2 coats for good coverage. Let dry.
- Rub candle onto all areas of frame and legs where a distressed look is desired.
- Paint 2 coats of a mixture of all the whites onto all surfaces. Let dry.
- Sand lightly with course sandpaper, then with fine grit sandpaper.
- Prepare the insert for the frame: Cut foam core to fit into the opening. Cut a layer of batting or felt slightly smaller than the foam core; attach to foam core. Cover all with linen fabric and glue to foam core on the underside, stretching tightly.
- Attach various photos to the linen, with your choice of adhesive. Attach to the underside of the frame, using L-brackets and short screws, inserting the glass first.
- Attach legs.
Source
Jo-Ann Fabric and Craft Stores
